
Picture
The Picture commands allows you to set up images, image maps, animations and various other effects to create dynamic and immersive scenes.
Adds a picture to the scene.
Number
- The picture's index (ID). This determines their layer order.
You can also use a variable by clicking on the [...] next to the number
input box.
File - The image file from the Pictures folder that is going to be displayed.
Anchor - Select the location of your anchor point
between top-left and center.
Setting the anchor to center is only important when the zoom and rotation
commands will used and will not affect positioning.
Position - Choose between Direct and Calculated positioning to place your image into the scene.
Predefined allows to select one of the predefined positions configured in Database > System > Predefined Object Positions.
Direct allows you to set the position using the graphical editor. You can also set the background image for higher accuracy.
Calculated allows you to position the picture by inputting the X and Y coordinates or through setting variables.
Duration - The duration of the join-animation in milliseconds.
Continue will make the scene immediately continue.
Wait will make the scene wait until the join animation is done.
Effects - These options affect how the picture will appear.
Easing sets the tween movement of the picture. More information can be seen in Easing Effects page.
Animation sets the movement of the picture.
Movement is the origin point of the picture where it will appear from Left/Top/Right/Bottom.
Blending allows you to fade in/fade out the picture.
Masking allows you to mask the picture to a Masks file.
Vague is the smoothness of the mask edges. Here is a comparison with Vague values 0 (minimum) and 255 (maximum).

Display - Allows you to specify the display order and anchor for the picture.
Z-order - Sets the display order of the pictures. You can also use a variable by clicking on the [...] next to the number input box.
Blend Mode - Determines what kind of blending used when the pictures is displayed on screen
Normal is the standard blend mode. It will simply just display the picture on the screen without mixing colors.
Additive results the picture to be applied in a lighter color.
Subtractive results the picture to be applied in a darker color.
Visual Type - Determines what kind of display-logic is used to display the picture on screen
Image - The selected image file is displayed on screen as a normal single image.
Tiling Image - The selected image file is tiled to fill up the space defined for Size.
Frame - The selected image file is used to construct a frame useful for in-game windows, etc. with the defined Size. Check out Resource Standards for more info about frames.
Thickness - The frame-thickness in pixel.
Corner Size - The corner-size of the frame in pixel.
Three-Part Image - The selected image file used to construct a three-part image useful for buttons, etc. with the defined Size. Check out Resource Standards for more info about three-part images.
Orientation - The orientation of the three-part image.. Can be Vertical or Horizontal.
Quad - The selected image file is ignored. Instead, a square with the selected Color and Size is displayed which is useful for message backgrounds, etc. The advantage over an image is that the graphics memory consumption is extremely low.
Color - The color of the square.
Size - Determines the size of the picture. That only affects pictures with a Visual Type other than Image.
Auto - The size of the picture is calculated automatically to match the size of the selected image file.
Set - The size of the picture is set to the defined size.
Width - The picture's width.
Height - The picture's height.
Viewport - The viewport the picture will be assigned to. The viewport determines if the picture gets affected by camera-movements or screen effects or not.
Scene - The picture is assigned to the scene-viewport and behaves like an object which belongs to the scene so it gets affected by camera-movements and screen effects.
User Interface - The picture is assigned to the ui-viewport and behaves like an object which belongs to the user interface so it doesn't get affected by camera-movements and screen effects.
Moves a picture to a specified position on screen.
Number - The picture's index (ID) that you want to move.
Position - Choose between Direct and Calculated positioning to set the destination of your image.
Predefined allows to select one of the predefined positions configured in Database > System > Predefined Object Positions.
Direct - Allows the user to set the target-position using the graphical editor.
Calculated - Allows the user to manipulate the target-position by variable.
Duration - The duration of the move-animation in milliseconds.
Continue will make the scene immediately continue.
Wait will make the scene wait until the move-animation is done.
Easing sets the tween movement of the picture. More information can be seen in Easing Effects page.
Changes the color tone of the currently displayed picture.
Number - The picture's index (ID) that you want to manipulate.
Tone
Control - Controls the picture color. Adjust the color tone
(-255 to 255) for Red, Green, and Blue.
Use Grey to set the intensity (0 to 255) of the grayscale filter. The
higher the value, the greater the overall strength of the color.
Normal, Dark, Sepia, Morning and Night buttons at the bottom of the
dialog box are to quickly apply the standard values for the tones
represented by their respective names.
The Normal button reverts to the original color tone. You can check
color tone changes in the preview area on the top side of the dialog
box.
Duration - Determines how long the tint effect will take place.
Continue will make the scene immediately continue.
Wait will make the scene wait until the exit animation is done.
Easing affects the animation of the tint. More information can be seen in Easing Effects page.
Fills the picture with the specified color for an instant, and then gradually reverts to the original color.
Color
Control - Controls the flash color. Use the Red, Green, and
Blue slider bars (0 to 255) to specify the color to flash.
You can check the color you specified in the preview area on the top
side of the dialog box. Use Power to specify the color's opacity (0
to 255).
Setting Power to "0" makes the color completely transparent,
rendering it invisible on screen.
Duration - Determines how long the flash effect will take place.
Continue will make the scene immediately continue.
Wait will make the scene wait until the flash animation is done.
Rotate your picture at specified speed and direction.
Number - The picture's index (ID) that you want to manipulate.
Direction - Set the picture to rotate in clockwise or counterclockwise direction.
Speed - The speed of the rotation. The higher the value, the faster it rotates.
Duration - Determines how long the rotation effect will take place.
Continue will make the scene immediately continue.
Wait will make the scene wait until the exit animation is done.
Easing affects the animation of the rotation. More information can be seen in Easing Effects page.
Erase an image already displayed on scene.
Number - The picture's index (ID) that you want to remove from the screen.
Duration - The time it will take for the image to disappear from the scene.
Continue will make the scene immediately continue.
Wait will make the scene wait until the erase animation is done.
Easing affects the erase animation. More information can be seen in Easing Effects page.
Animation sets the movement of the picture.
Movement is the origin point of the picture where it will disappear to Left/Top/Right/Bottom.
Blending allows you to fade out the picture.
Masking allows you to mask the picture to a Masks file.
Vague is the smoothness of the mask edges. Here is a comparison with Vague values 0 (minimum) and 255 (maximum).

Redefine the borders of your picture to frame your image the way you wish to display it without having to edit the original image file.
Number - The picture's index (ID) that you want to manipulate.
X - Begins the cropped image from x pixels from the left or right of the original dimensions of the picture.
Y - Begins the cropped image from x pixels from the top or bottom of the original dimensions of the picture.
Width - Sets the new width of your cropped image starting from the X position you set above.
Height - Sets the new height of your cropped image starting from the new Y position you set above.
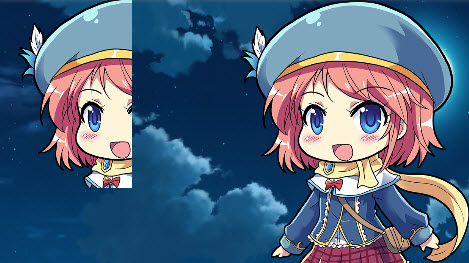
Blends a picture to the specified opacity.
Number - The picture's index (ID) that you want to manipulate.
Opacity - The opacity.
Duration - The duration of the blend-animation.
Continue will make the scene immediately continue.
Wait will make the scene wait until the blend animation is done.
Easing affects the blend animation. More information can be seen in Easing Effects page.
Zooms pictures.
Number - The picture's index (ID) that you want to manipulate.
Zoom X - Affects horizontal zoom of the picture.
Zoom Y - Affects vertical zoom of the picture.
Duration - The rate at which the image will alter its zoom percentage.
Continue will make the scene immediately continue.
Wait will make the scene wait until the zoom animation is done.
Easing affects the zoom animation. More information can be seen in Easing Effects page.
Applies a mask to a picture.
Number - The picture's index (ID) that you want to manipulate.
File - Choose a mask file to apply to your picture(s).
Picture allows you to use a Mask image file in Graphics/Masks.
Movie
allows you to use a movie file
ask a mask. Your movie file will need to be imported to the Movies
folder in .webm format.
Even if your movie file contains color information it will use the
red color-channel for masking.
Type Select what kind of masking you would like to do.
Static
allows you to overlay a mask image which is applied with alpha.

Offset X moves the mask image left or right depending on the values set.
Offset Y moves the mask image top or bottom depending on the values set.
Dynamic
masking allows you to use mask to display specific parts of a picture
image.

Value can be any amount from 0 to
255. It controls which pixels from the masked image will be visible.
If it's 0, then it will display none of the image mask. The more values
you add, the more of the image mask is visible.
Vague allows you to apply smoothing on the mask edges. Here is a comparison with Vague values 0 (minimum) and 255 (maximum)
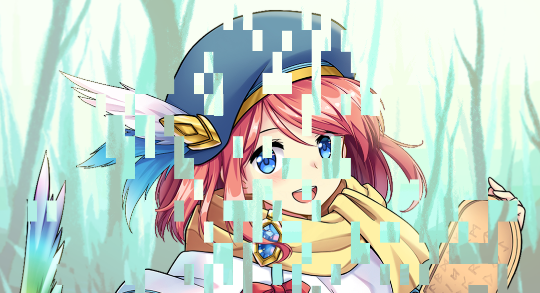
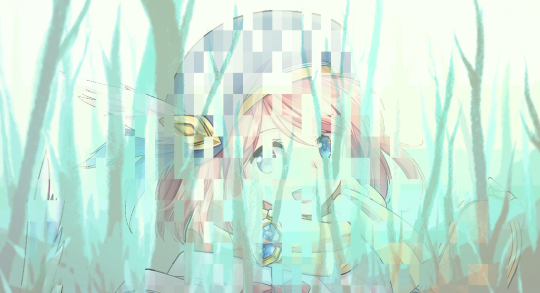
Duration - Determines how fast the mask effect will take place.
Continue will make the scene immediately continue.
Wait will make the scene wait until the masking effect is done.
Effects - These options affect how the picture will appear.
Easing sets the tween movement of the picture. More information can be seen in Easing Effects page.
Create an image map and define its states and regions the user can interact with. Image-Maps share the same number/id space with pictures. That means that all picture commands will work for image-maps as well except Rotate Picture and Zoom Picture.
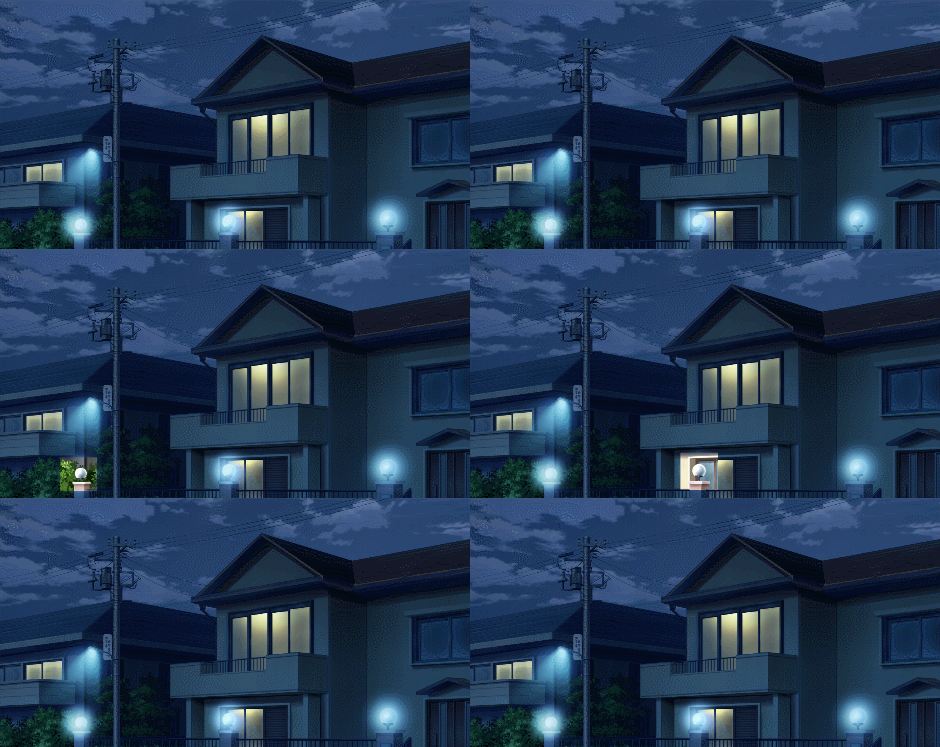
Number - The image-map's number (ID). Necessary to distinguish between multiple image-maps.
Position - Choose between Direct and Calculated positioning to place your image-map into the scene.
Predefined allows to select one of the predefined positions configured in Database > System > Predefined Object Positions.
Direct allows you to set the position using the graphical editor. You can also set the background image for higher accuracy.
Calculated allows you to position the image-map by inputting the X and Y coordinates or through setting variables.
Ground - Base image of your map.
Hover - Allows you to set an image to display while the mouse is hovering over a hotspot region. Take into account that the image must be the same dimension as the ground image.
Hotspots - Define regions that will detect cursor/user interaction. You can add, remove and move hotspots.
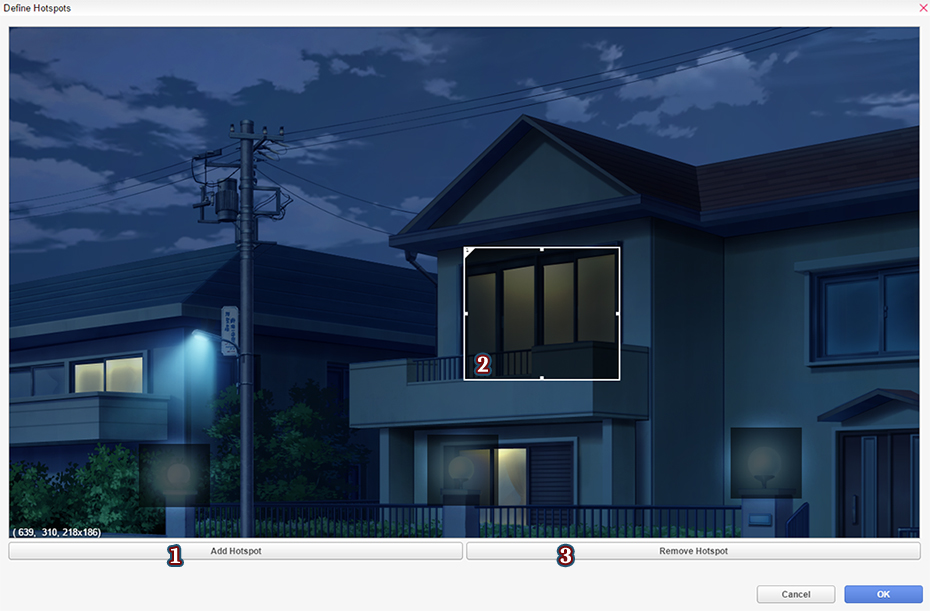
(1) Add Hotspot - Adds a hotspot in the image map.
(2) Hotspot - Adds an interactive region that will display a part of the hover/selected/unselected image on it depending on its state. You can change the size and set properties to it when double clicked.
Hotspot Properties
- Allows you to set properties for an image map's hotspot. This
can be accessed by double clicking a hotspot.
.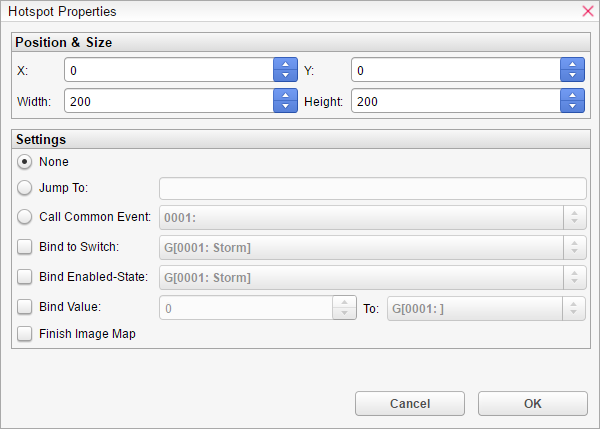
Position and Size - Adjust the hotspot's coordinates and size through values.
X adjusts the position of the hotspot to left or right.
Y adjusts the position of the hotspot to top or bottom.
Width adjusts the hotspot's width.
Height adjusts the hotspot's height.
Settings -Gives a hotspot a property. This activates when a hotspot is clicked.
Jump to calls a label.
Call Common Event calls a common event.
Bind to Switch stores the selection-state of the hotspot in the selected switch.
Bind Enabled-State stores the enabled-state of the hotspot in the selected switch.
Bind Value stores a custom number-value into the specified number-variable if the hotspot gets clicked.
Finish
Image Map stops the Image Map command and initiates the
next set of commands.
You have to call "Erase Image Map" manually to remove
it from the screen.
(3) Remove Hotspot - Removes a hotspot from the image map.
Duration - The length of time it will take for the image map to appear.
States - This section is for setting desired graphics for Unselected, Selected, and Selected Hover states.

Unselected - The hotspot's image when it is enabled. The ground image is not visible until its disabled.
Selected: Sets the image for how the region will appear once the region has been selected. This only works if Bind To Switch is set.
Easing sets the tween movement of the image-map. More information can be seen in Easing Effects page.
Animation sets the movement of the image-map.
Movement is the origin point of the image-map where it will disappear to from Left/Top/Right/Bottom.
Blending allows you to fade out the image-map.
Masking allows you to mask the image-map to a Masks file.
Vague is the smoothness of the mask edges.
Removes an image map.
Number - The number (ID) of the image-map to erase. Necessary to distinguish between multiple image-maps.
Duration - The amount of time it will take for the image map to disappear.
Continue will make the scene immediately continue.
Wait will make the scene wait until the exit animation is done.
Easing sets the tween movement of the picture. More information can be seen in Easing Effects page.
Animation sets the movement of the picture.
Movement is the origin point of the picture where it will disappear to the Left/Top/Right/Bottom.
Blending allows you to fade out the image-map.
Masking allows you to mask the image-map to a Masks file.
Vague is the smoothness of the mask edges.
Allows you to create custom path of movement through the use of points and curves to move the picture.
Number - The index (ID) of the picture to move.
Path - Opens up a path editor that allows you to define the path via curves. You can press right click to delete a motion point or click at a free area to add a new motion point.
The S circle ( )
is the start point of the motion.
The green circle ( ) is a point in the motion
that allows you to have a more dynamic motion.
The yellow circle ( ) adjusts the motion curve.
If you press a green circle (
 ), you can adjust
the motion for that path as well.
The E circle ( )
is the end point of the motion.

Mirror Vertical - Flips the curve vertically.
Mirror Horizontal - Flips the curve horizontally.
Rotate 90* - Rotates the curve at 90 degrees.
Effects - Allows you to set sound effects at timed intervals while the background moves along the path.
Loop - Allows you to repeat the path for the extent of its duration.
None - Turns the loop off.
Normal - Loops the path from the end point.
Reversed - Loops the path in the opposite direction from the end point.
Duration - The time the motion has to finish in milliseconds.
Wait/Continue - Setting the command to wait means that the scene will wait for the motion to end before it loads the next command.
Displays an animation on the screen. Animations share the same number/id space with pictures so all Picture commands will work with animations too.
Number - The picture's index (ID) that you want to use to play the animation.
Animation - The animation you want to use from the database.
Anchor
- Select the location of your anchor point between top-left and center.
Setting the anchor to center is only important when the zoom and rotation
commands will be used and will not affect positioning.
Position - Choose betweeen Predefined, Direct and Calculated positioning to place your animation into the scene.
Predefined allows to select one of the predefined positions configured in Database > System > Predefined Object Positions.
Direct allows you to set the position using the graphical editor. You can also set the background image for higher accuracy.
Calculated allows you to position the animation by inputting the X and Y coordinates or through setting variables.
Duration - The duration of the appear-animation in milliseconds.
Continue will make the scene immediately continue.
Wait will make the scene wait until the appear-animation is done.
Effects - These options affect how the picture will appear.
Easing sets the tween movement of the picture. More information can be seen in Easing Effects page.
Animation sets the movement of the picture.
Movement is the origin point of the animation where it will appear from Left/Top/Right/Bottom.
Blending allows you to fade in/fade out the animation.
Masking allows you to mask the animation to a Masks file.
Vague
is the smoothness of the mask edges. Here is a comparison
with Vague values 0 (minimum) and 255 (maximum)

Display - Allows you to specify the display order and anchor for the picture.
Z-Order - Sets the display order of the pictures. You can also use a variable by clicking on the [...] next to the number input box.
Blend Mode - Determines what kind of blending used when the pictures is displayed on screen
Normal is the standard blend mode. It will simply just display the picture on the screen without mixing colors.
Additive results the picture to be applied in a lighter color.
Subtractive results the picture to be applied in a darker color.
Vigorously move your picture for a dramatic effect.
Number - The picture's index (ID) that you want to manipulate.
Range
X - Set the horizontal movement of the picture. It randomizes
between the negative and positive of the value you set.
For example, if you put 5, it will shake the picture from -5 to 5.
Range
Y - Set the vertical movement of the picture. It
randomizes between the negative and positive of the value you set.
For example, if you put 5, it will shake the picture from -5 to 5.
Speed - Will determine the power or intensity of the shaking by setting a pixel offset.
Duration - The duration of the zoom in milliseconds.
Continue will make the scene immediately continue.
Wait will make the scene wait until the exit animation is done.
Effects - These options affect how the picture will appear.
Easing sets the tween movement of the picture. More information can be seen in Easing Effects page.
Applies an effect to a picture..
Type - The effect that will be applied to the picture.
Wobble makes the movie move in irregular and staggering motion. That only works if looping is disabled.
Power sets the intensity of the wobble. It makes the wobble effect more visible the higher it is.
Speed sets the speed of the wobble. The higher it is, the faster it is.
Orientation - Sets the wobble direction.
Vertical sets the wobble direction to the vertical direction.
Horizontal sets the wobble direction to the horizontal direction
Both sets the wobble direction to both directions.
Duration sets how long, in milliseconds, the effect will take place.
Blur has no effect on pictures.
Pixelate makes the picture appear pixelated/blocky.
Width sets the width of a single block/pixel.
Height sets the height of a single block/pixel.
Duration sets how much time, in milliseconds, it takes until the pixelation reaches the specified block/pixel-size. Use this to smoothly pixelate the picture.
Easing applies tweening to the effect animation. More information can be seen in Easing Effects page.
Applies motion blur to your picture. This must be set above the picture's movement commands such as [Move Picture] or [Move Picture Along Path].
Motion Blur - Set Yes to apply motion blur, No to turn it off.
Spawn Time - The amount of frames after a new copy is created. By default, the amount is 2.
Dissolve Speed - The rate at which the spawned copies dissipate. Specifically, the opacity of the copies are dropped every frame.
Opacity - The opacity a copy
starts at the time it is spawned. By default, it is at 100.
For example, if the dissolve speed is 2, the shadow/ghost/particle
is completely invisible/dead after 50 milliseconds.
Adds clickable and/or drag-able regions to the screen. If you click on a hotspot, the state becomes "selected." It stays that way until you click the hotspot again.
Number - The hotspot's index (ID) that you want to manipulate.
Position - Choose between Direct and Calculated positioning to set the destination of your hotspot.
Direct - Allows the user to set the target-position using the graphical editor.
Calculated - Allows the user to manipulate the target-position by variable.
Picture Number - Transform one of the currently displayed image(s) to a hotspot.
Hotspot Properties - Allows you to set properties of a hotspot. This can be accessed by Double Clicking or Right-Click -> Properties a hotspot.
Position and Size - Adjust the hotspot's coordinates and size through values.
X adjusts the position of the hotspot to left or right.
Y adjusts the position of the hotspot to top or bottom.
Width adjusts the hotspot's width.
Height adjusts the hotspot's height.
Flip Horizontally / Flipped flips the hotspot.
On Click - When the user clicks, it will trigger a command.
Jump to jumps to a label.
Call Common Event calls a common event.
Bind to Switch stores the selection-state of the hotspot in a switch.
Call Scene calls a scene same way as Call Scene command does.
Bind Value will put the defined number-value into the specified number-variable and then jumps to a label. This is useful to figure out which hotspot has been triggered if the same label has been used for multiple hotspots.
To is the variable to store the number-value in.
Jump To Label specifies the label to jump to.
Images - Affects the appearance of the hotspot based on certain conditions.

Base - The hotspot's base image. This is only visible if Unselected is empty and/or the hotspot is disabled.
Hover - The hotspot's image when the mouse is hovering above it.
Selected - This image appears if the hotspot is selected.
Selected Hover - This image appears if the hotspot is selected and the mouse is hovering above it.
Unselected - The hotspot's image when it is enabled and hasn't been selected yet. You cannot see the base image if you set one unless the hotspot is disabled.
Dragging - Drag properties of a hotspot.
Draggable - If the option is set to Yes, it means the hotspot can be dragged.
Horizontal - If the option is set to Yes, it means the hotspot can be dragged left and right.
Vertical - If the option is set to Yes, it means the hotspot can be dragged up and down.
Track Rect - The range of the hotspot's dragging area.
Store In - Stores the hotspot's current position by percentage to a variable. If Horizontal and Vertical are both enabled, the percentage stored is from the Horizontal movement. This only wor
Actions - When the hotspot is visible, pressed or deselected it will perform actions.
On Enter - When the mouse enters the hotspot's area, it will perform one of the following actions.
On Select - When the hotspot is selected, it will perform one of the following actions.
On Deselect - When the hotspot is selected and pressed again to deselect it, it will perform one of the following actions.
On Leave - When the mouse leaves the hotspot area, it will perform one of the following actions.
On Enter, On Select, On Deselect, On Leave, On Drag all have the following settings.
Jump to jumps to a label.
Call Common Event calls a common event.
Call Scene calls a scene the same way as Call Scene command does.
Bind Value puts a number-value into the specified number-variable when the event has been triggered and jumps to the specified label.
To is the number-value to put into the number-variable.
Jump To Label specifies the label to jump to.
Bind to Switch Stores the state of the even in a switch.
On Enter - Sets the switch to ON if the mouse enters the hotspot's area.
On Select - Sets the switch to ON if the hotspot is selected.
On Deselect - Sets the switch to OFF if the hotspot is deselected.
On Leave - Sets the switch to OFF if the mouse leaves the hotspot's area.
Changes a hotspot's state.
Number - The hotspot's index (ID) that you want to manipulate.
Selected - Toggles the hotspot's 'selected' state to On/Off.
Enabled - Enables or Disables the hotspot.
Erases a hotspot from the screen.
Number - The picture's index (ID) that you want to manipulate.
Allows to override default values for picture specific commands.
Appear Duration is the duration of the show-animation in milliseconds.
Disappear Duration is the duration of the erase-animation in milliseconds.
Appear Effects
Easing is the easing settings used for the show-animation.
Animation is the animation settings for the show-animation.
Disappear Effects
Easing is the easing settings used for the erase-animation.
Animation is the animation settings for the erase-animation.
Display.
Anchor - Select the location of
your anchor point between top-left and center.
Setting the anchor to center is only important when the zoom and rotation
commands will used and will not affect positioning.
Z-Order is the Z-Index of a picture.
Motion Blur - Set Yes to apply motion blur, No to turn it off.
Spawn Time - The amount of frames after a new copy is created. By default, the amount is 2.
Dissolve Speed - The rate at which the spawned copies dissipate. Specifically, the opacity of the copies are dropped every frame.
Opacity - The opacity the copied
image starts at the time it is spawned. By default, it is at 100.
For example, if the dissolve speed is 2, the shadow/ghost/particle
is completely invisible/dead after 50 frames.