The
Message commands allows you to input dialogue-related events to Scenes.
Message
Box Visibility
The Message
box is where all dialogue from a message box is displayed. However, the
message box is independent from the message text. So even if the message
box is hidden, the message text will be still visible. Use [Message Visibility]
command to show/hide the actual message text.
ID - The ID of the message box UI
object to show. By default this is "messageBox" unless you
define additional message boxes in Layouts > Layout_Game in Script Editor.
Visible - Changes the visibility
of the message box. If yes, it will be visible. If no, it will be
hidden.
Duration - The duration of the message
box visibility in milliseconds.
Effects - These options affect how
the Message Box will appear.
Message
Visibility
Controls
visibility of the actual message/dialogue. However, the message text independent
from the message box. So even if the message text is hidden, the message
box will be still visible. Use [Message Box Visibility] command to show/hide
the message box.
Visible - Changes the visibility
of the message text. If yes, it will be visible. If no, it will be
hidden.
Duration - The duration of the message
text visibility in milliseconds.
Effects - These options affect how
the Message Text will appear.
Message
Fading
This command
affects how fast messages are erased. This
doesn't work if Auto Erase in [Message Settings] is turned off.
Message
Settings
This command
changes the default options of the Message Box display.
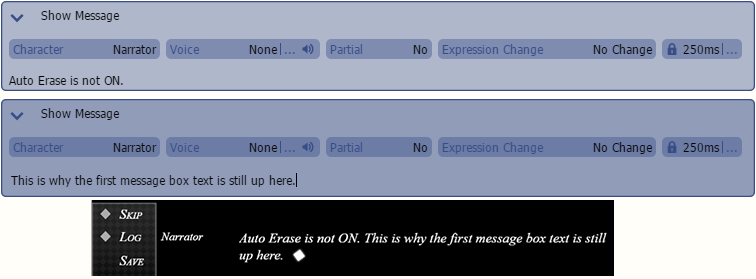
Auto Erase - By default, it is turned
ON. If it is turned off, the text from the previous message box will
not be cleared out. But you can use [Clear Message] command to clear
the current message text manually.
Wait at End - By default it is ON.
It waits for user input before displaying the next set of messages.
If it's turned off, will ignore input and display the next set.
Backlog - Indicates if messages
are added to the backlog.
Font - Change the font displayed.
The font must be in .WOFF format or a system-installed font.
Size - The size of the font.
Style - Sets the message text style.
Color - The color of the text.
Bold - Makes the text bolder.
Italic - Makes the text oblique.
Small Caps - Makes lower-case
letters appear as small upper-case/capitalized letters.
Underline - Draws a horizontal
line under the text to make it look underlined.
Strikethrough - Draws a horizontal
centered line over the text to make it look strike-through.
Line Height - The minimum
height of a single message text line in pixels. You can specify
0 to use the automatically calculated height of the text.
Line Spacing - The spacing between
message text lines in pixels.
Line Padding - The left
and right padding of a single message text line in pixels.
Outline - Add an outline to the
message text.
Color - Controls the outline
color. Use the Red, Green, and Blue slider bars (0 to 255) to
specify the color to flash.
You can check the color you specified in the preview area on the
top side of the dialog box. Use Power to specify the color's opacity
(0 to 255).Setting Power to "0" makes the color completely
transparent, rendering it invisible on screen.
Size - The thickness of
the outline in pixels.
Shadow - Add a shadow to the
message text.
Show
Message
This command
displays text in Adventure (ADV) game style. If the arrow ( ) is down, you can view
and input the text to display.
) is down, you can view
and input the text to display.
Character - The character you want
to be speaking in the scene.
Voice - The voice file to be
played for the message.
Partial - If enabled, it will allow
other Scene commands to be activated while the message is being displayed.
Expression Change - The character's
expression for the message.
Duration
- The speed of the message display
in milliseconds.
Add Choice
This command
adds a choice option to the scene.
All added
choices are not displayed on screen until [Show Choices] command is called.
So it can be combined with the [Condition]
command to create a dynamic choice selection.
Description - The content of the
choice.
On Select - Defined what should
happen if the choice is selected/clicked by the user.
Jump To - When selected, go
to the Label that is specified.
Call Common Event - When selected,
call the specified common event.
Bind To - When selected, sets
the specified switch to ON.
Call Scene - When selected,
calls the specified (sub)-scene. See [Call Scene] command.
Position - The position of the choice.
Default - If [Choice Timer] is active
or the game is in skip-mode, the choice that will be selected is the
one with this command enabled.
Enabled - Indicates if the choice
is enabled. A disabled choice is still displayed but cannot be selected
by the user.
Show
Choices
This command
displays all the choices you set.
.Show
NVL Message
This command
displays text in Novel (NVL) game style. If the arrow ()
is down, you can view and input the text to display.
Close
NVL Page
Closes
the NVL Message display.
Clear
Message
This command
clears all messaged displayed. This affects both ADV and NVL mode.
Input
Number
Displays
a window for entering a value. It then assigns the value that the player
entered to a variable.
Input Text
Displays
a window for entering a value. It then assigns the value that the player
entered to a variable. You can change the available letters in Database
> System > Text-Input Letter-Set.
Create
Message Area
Creates
additional area(s) where messages can be displayed. If more than one message
box is needed to be displayed at the same time, this command can be used
to do so. Such examples are comic book bubbles.
Number - The message area's index
(ID). This allows you to determine which area to manipulate.
Position - The message area's position
& size on screen.
Template - The UI template used
for this area. The default is ui.CustomGameMessage
which can be found in Layouts/Templates/Template_MessageBox in Script
Editor.
See [Set Message Target] to check how to display
messages in the message area.
Set
Message Area
Changes
the position and size of a message area.
Set
Message Target
This allows
you to set the target area for the message commands (ex. Show
Message) that follow it.
You can
display the contents through an area made with [Create Message Area] command or a
layout-based message area that can be found in the In-Game UI System.
Type - The target type.
Area - Display the text in an area
made with the [Create Message Area]
command.
Layout-Based - A message area configured
through the In-Game UI System.
Clear- Indicates if the new target
message area should be cleared.
-
Erase
Message Area
Erase a
message area. After that the message area can no longer be used an all
message commands pointing to that area are automatically forwarded to
the default message area.
Choice
Timer
Put a time
limit on player choices. The choice with the Default as yes will be automatically
picked if the player runs out of time.
Min means minutes.
Sec
means seconds.
Backlog
Visibility
This command
calls and affects the log window.
Visible
- If enabled, it will display the Log Window.
Background
Visible - If disabled, it will hide the Log Window background
image. So you can use a custom background image.
Message Box Defaults
This command
changes how the default movement of the Message Box works
Easing
sets the tween movement of the message box. More information can be
seen in Easing Effects page.
Animation
sets the movement of the message box.
Movement is the origin point of
the message box where it will appear from Left/Top/Right/Bottom.
Blending allows you to fade in/fade
out the message box.
Masking allows you to mask the message box to
a Masks file.
Text Codes
Text codes
are message commands that applies a function during the message text processing
like changing the style of the text or showing the content of a variable
in the message.
Text
Code |
Function |
{N:index} |
Displays the Character Name. |
{C:index} |
Displays the text based on the Color code specified. |
{SP:index} |
Plays a Sound effect during message. |
{SZ:size} |
Changes text size. |
{Y:I} |
Applies Italic style to text. |
{Y:B} |
Applies Bold style to text. |
{Y:C} |
Applies small-caps to text. |
{Y:U} |
Applies underline style to text |
{Y:S} |
Applies strike-through style to text |
{Y:N} |
Erase all styles applied in the message. |
{GN:index} |
Displays the value of Global Number Variable. |
{GT:index} |
Displays the value of Global Text Variable. |
{GS:index} |
Displays the value of Global Switch. |
{GL:index,elm} |
Displays the value of Global List.
For example, {GL:1,0} <- Global List Variable
1, Element at Index 0. |
{LN:index} |
Displays the value of Local Number Variable. |
{LT:index} |
Displays the value of Local Text Variable. |
{LS:index} |
Displays the value of Local Switch. |
{LL:index,elm} |
Displays the value of Local List.
For example, {LL:1,0} <- Local List Variable
1, Element at Index 0. |
{PN:index} |
Displays the value of Persistent Number Variable. |
{PT:index} |
Displays the value of Persistent Text Variable. |
{PS:index} |
Displays the value of Persistent Switch. |
{PL:index,elm} |
Displays the value of Persistent List.
For example, {PL:1,0} <- Persistent List Variable
1, Element at Index 0. |
{S:speed} |
Adjust the message speed based on the value set. By default,
you can put the following values:
0 - Slowest
1 - Slow
2 - Normal
3 - Fast
4 - Fastest
5 - Instant |
{W:ms} |
Wait for a few milliseconds before the rest of the message
continues. |
{WE:Y} |
Wait at End YES. |
{WE:N} |
Wait at End NO. |
{W:A} |
Wait for input like a key or button press. |
{DI:Y/N} |
Displays a text immediately.
Y = Draw Immediately, N = Stop Draw Immediately. |
{A:index} |
Display an animation inside the message box. |
{LK:index} |
Displays the text as a clickable link and calls the common
event at the specified index. |
{LK:E} |
Ends clickable link formatting. |
{E:index} |
Change the expression of the character based on the Show Message's
set character. |
{M:name} |
Executes the user defined command in Text
Macro. |
{RT:rb/rt/id} |
Displays a ruby-text.
The "rb" value is the ruby-base text.
The "rt" is the ruby-text placed above
the ruby-base text.
The "id" is optional and specifies
the index of the style to use for the ruby-text. By default, the
style "rubyText" defined in script "Style_Default"
is used. If the id is set to a value, that value is added as a
suffix to the style-name like "rubyText-2" if the id
is 2. |
{SLK:index,id} |
Displays the text as a styleable clickable link and calls the
common event at the specified index. Unlink LK, it allows you
to apply a custom style to the link defined in a script.
The id is optional and specifies the index of
the style to use. By default, the style "hyperlink"
defined in script "Style_Default" is used. If the id
is set to a value, that value is added as suffix to the style-name
like "hyperlink-2" if the id is 2.
However, a styleable link costs more performance
than a regular link. Also, it is not possible to add any other
style text-codes to a styleable link since the style comes from
a style-definition in script. |
{SLK:E} |
Ends styleable link formatting. |