Understanding Predefined Object Positions
Predefined Position is a nifty feature that allows you to set formulas to position a character on the screen. One of its major benefits is that it allows you to change your work as needed. This is useful for cases such as if you need to change your assets with different file dimensions or you changed your mind on where to position the characters. You can normally find them at commands that requires coordinates. If you are unfamiliar or need a refresher towards Coordinate Planes, here are some videos. For example, you can find it here in Join Scene:

If you need a refresher for Geometry's Coordinate Plane, here are a few lessons from Khan Academy.
You can find, modify and/or create Predefined Object Positions in ![]() Database ->
Database -> ![]() System.
System.
Understanding Objects
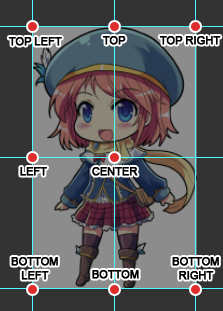
When you see the Predefined Object Position for the first time, You will notice that there's Top Left, Top, Top Right, Bottom Left, Bottom, Bottom Right, Left and Center. The reason they're named this way is because of the target object's anchor point. Here's an image to explain:

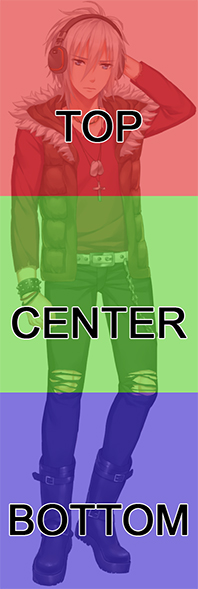
You might wonder, what is the difference between Top, Bottom and Center because they essentially do the same function; center the character on the screen. To understand the difference, let's say you want to display Ace on the screen, then the proximity of his body will be displayed like this:

This means, if you want to show Ace's head, you will select the Top Left, Top and Top Right coordinates. If you want to focus on his body, then you will go with center and so forth. The proximity of the display also depends on the image's width and height; this means that you have take into consideration even the transparent areas of the image. So if you were wondering how it knows whether it should display top left, left or right of the screen.
Deconstructing the Formula
So we know which part of the character is going to be displayed; but how about their position on this screen? Looking at the example formula might intimidate you at first, but don't worry! It's not as complicated as you might think. Let's break down the formula for Top.
return { x: (Graphics.width - object.dstRect.width * object.zoom.x) / 2, y: 0 }
How does it work?
First, we need to know the width of our screen. By default, the in-game resolution is 720p (1280x720).
Now, let's divide that screen by two (2). We will be left with 640.
But if you display the object (character), it wouldn't be immediately centered. It will look like something like this:

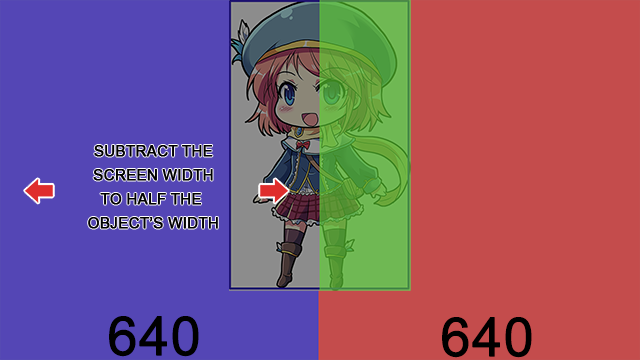
Now, we want to center the object, you need to divide the object by two (2) and then subtract it from other half of the screen.
In pseudo-code form, it should look something like this:
x = (Screen Width / 2) - (Object Width / 2)
Assuming that you didn't zoom the object, this is how it will look like. Visually what the code does is this:

Writing the Formula from scratch
Now let's simplify it by starting from scratch. Remember the order of operations in Mathematics, PEMDAS (Parentheses, Exponents, Multiplication, Division, Addition, Subtraction). If you are unfamiliar or just need to brush up on your algebra, Khan Academy has an awesome tutorial that you can watch here.
First, write the formula like this:
return { }
return { x: }
return { x: (Graphics.width - object.dstRect.width) / 2 }
Now, let's say that you might want to zoom in/out the object later, we cannot use this formula. When an object is zoomed in/out, their positioning changes as well due to the changed width and height. So we would need to add another variable.
return { x: (Graphics.width - object.dstRect.width * object.zoom.x) / 2 }
Finally, we'll check the character's Y coordinate. Since this is for Top Center, we just need to input 0.
return { x: (Graphics.width - object.dstRect.width * object.zoom.x) / 2, y: 0 }
That's about it! If you want another example on how to use predefined position for your Visual Novel, go over Displaying a Bust Image!