For Android
Testing & Deployment for Android requires a few preparation steps to work properly. This topic will guide you through the necessary steps and tries to make everything as easy as possible for you. If you get stuck or have any question, please take a look at our support forums.
Requirements
To test and/or deploy your game on Android, you have to meet the following requirements:
If you plan to submit your game to the Google Play Store, which is optional, you have to do the following steps:
It is also recommend to take look at the Android Platform Guidelines
for Cordova which you can find here:
https://cordova.apache.org/docs/en/latest/guide/platforms/android/
Let's go through the above step-by-step.
Install JDK (Java Development Kit)
You need to install the JDK (Java Develpment Kit). You can download it from here:
http://www.oracle.com/technetwork/java/javase/downloads/jdk8-downloads-2133151.html
Install Android Studio + SDK
You need the Android SDK to build and deploy your game for Android. You can install just the Android SDK Tools only or the entire Android Studio bundled with the SDK. You can get it from here:
https://developer.android.com/studio/index.html#downloads
Install Node.js
You need Node.js to run Cordova which is needed to package your game correctly for Android deployment. You can download Node.js from http://nodejs.org
Install Cordova
You need Cordova to package your game correctly for Android deployment. To install Cordova, just open a Terminal / Command-Line window.
Once the terminal has been opened, you will see a black window (in most cases) with a blinking cursor where you can type in some text (commands). Just type the following command:
npm install -g cordova
and press the return-key. After that, a lot of text will be displayed on terminal window. Just wait until everything is done. Then type:
cordova --version
and press return-key. If you see the cordova version number, the installation was successful. If you get an error, something went wrong. In that case, take a look at the text/message on the terminal window and take a look in our forums for help.
Sign up for Google Play Store (Optional)
This step is optional and you can skip if you just want to test your app or if you don't plan to ship your game via Google Play Store. Just visit:
https://play.google.com/apps/publish/signup
to sign up and follow the guides on that website to learn more about how to submit your game to the Google Play Store. At time of writing, it will cost you 25 USD per year.
Prepare your VN Maker Project for Android Deployment
Since everything has been setup now, you can start to build your game for Android! Make sure your project has a game title in Database > System.
Audio & Video Assets
At the time of writing, Android games packaged via Cordova may have problems with .m4a/.mp4/.mp3/.aac audio and .mp4 video formats. To be safe, you should use .ogg & .wav for Audio and .webm,for Video. Make sure that you convert all your audio and video files into the necessary format. VN Maker allows you to import the same file multiple times with a different format and then automatically chooses the right format at runtime which is useful for HTML5 Webbrowser Games. However, if you plan to ship your game offline over the Play Store or just as APK download, you should delete any unused files to reduce file size.
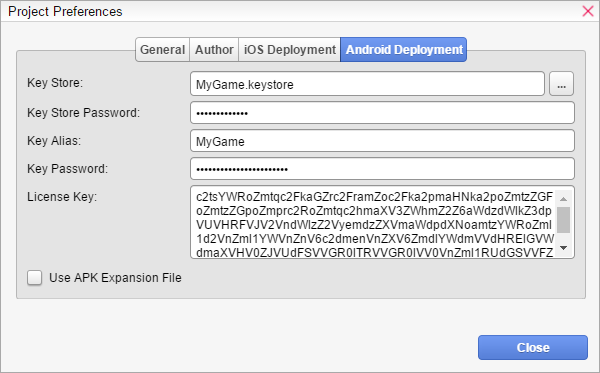
Project Preferences (Signing & Play Store)
If you just want to internally test your app on Android, you can skip the following step. Otherwise, you need to open Project Preferences and navigate to the Android Deployment tab.
(The displayed data is not real and just to give you and example about what kind of data you have to input here).
You need to specify your keystore information to sign the APK properly. Otherwise it will be signed with a development-certificate. You can ignore License Key and Use APK Expansion File if you don't want to submit your APK to Play Store. Also, make sure to enter a unique Game ID on General tab.
Once you have entered all the necessary information, click the Close button and save your project.
Testing on Android
If you want to do a quick play-test on Android, just connect your device to your computer and make sure it stays unlocked/active. Make sure the Developer Mode is enabled on your device. Check the Settings app on your Android device to enable Developer Mode and the execution of unsigned APKs.
Next choose Build For > Android (Cordova) from The Menubar to build your game for Android. The build-process will take a few minutes. After the build-process is done, open the Debug Console via Tools > Debug Console and check for any errors.
You can find the .apk file inside the build-folder of your project:
<project-folder>/build/<project-name>/<project-name>/platforms/android/build/outputs/apk/<project-name>.apk
if you want to install it manually.
Now you can play your game on your connected device by choosing Play On > Android (Cordova) from The Menubar. You game-build will be transfered and installed to your connected device which might take a few minutes and then start automatically. Check Debug Console for any errors. If you game doesn't start automatically, you have to start it manually.
Deploy for Android
By default, VN Maker supports to export a single APK for self-publishing or other stores and also to export for use with Play Store.
Deploy an APK for self-publishing
You can deploy your game for Android using the Create Game Package wizard. Just select "Android (Cordova)" from the list of platforms. Open the Debug Console to check for errors. The package creation may take a while. You can find the .apk file at:
<output-location>/<project-name>/<project-name>/platforms/android/build/outputs/apk/<project-name>.apk
Deploy an APK for Play Store
You can deploy your game for Android Play Store using the Create Game Package wizard. Just select "Android (Cordova, Play Store)" from the list of platforms. Make sure that you put in all necessary information in to the Android Deployment tab in Project Preferences. Open the Debug Console to check for errors. The package creation may take a while. You can find the .apk file at:
<output-location>/<project-name>/<project-name>/platforms/android/build/outputs/apk/<project-name>.apk
For more information about how to submit your app to the Play Store, just follow the guides on the Google Play Store Website.
Troubleshooting
If you went through all the above steps without any errors then congratulations! But that is not the regular case, especially not if your doing this the first time. So don't worry if you get stuck or get any error messages since those are related to wrong configuration in most cases and can be solved easily.
The first thing you should try to do is to figure out the error message by checking the error logs. Sometimes the error messages are understandable even for non-programmers. Common errors are:
If you get stuck with any error and if you cannot fix them yourself, just take a look at our support forums.